Achieving Network Redundancy on Proxmox Servers with Linux Bonds and Bridges

In any enterprise or production environment, network redundancy is crucial for maintaining uptime and preventing a single point of failure. On Proxmox servers, you can achieve this redundancy by using Linux network bonding and bridging. Bonding allows you to aggregate multiple network interfaces, while bridges provide virtual networking between physical and virtual machines (VMs). When combined, they ensure that your Proxmox server has a resilient network setup with failover capabilities.
This guide will walk you through setting up network bonds and bridges on Proxmox to create a redundant and highly available network environment.
Why Use Bonds and Bridges for Redundancy?
Bonding: Network bonding combines multiple network interfaces into a single logical interface, providing redundancy and, in some configurations, increased throughput. If one interface fails, traffic automatically routes through another, ensuring continuous network connectivity.
Bridging: A bridge acts like a virtual switch, allowing VMs and containers on your Proxmox host to communicate with each other and the external network. A bridge connected to a bonded interface ensures that your VMs benefit from the redundancy provided by the bond.
Understanding Linux Bonding Modes
Linux network bonding supports various modes. Here are a few key modes commonly used for redundancy:
Mode 0 (balance-rr): Round-robin policy; transmits packets in sequential order from the first available interface to the last. Offers load balancing and fault tolerance.
Mode 1 (active-backup): Only one interface is active at a time. If the active interface fails, another interface takes over. This mode provides redundancy but not load balancing.
Mode 2 (balance-xor): Transmits based on the source and destination MAC addresses. Load balancing and fault tolerance.
Mode 4 (802.3ad): IEEE 802.3ad Dynamic Link Aggregation (LACP). Requires support from the switch. Provides load balancing and redundancy.
For redundancy purposes, mode 1 (active-backup) is often the simplest and most widely supported, but mode 4 (LACP) is a great option if your switches support it and you want both redundancy and load balancing.
Step 1: Plan Your Network Setup
Before configuring bonds and bridges, you should carefully plan your network topology:
- Network Interfaces: Identify the physical network interfaces (e.g.,
eth0,eth1) that you want to bond together. - Switch Configuration: Ensure your switch supports bonding (also known as link aggregation or LACP) if you plan to use more advanced modes like mode 4.
- VLANs (Optional): If you’re using VLANs, map out the VLAN IDs and how they will be handled by your bridge.
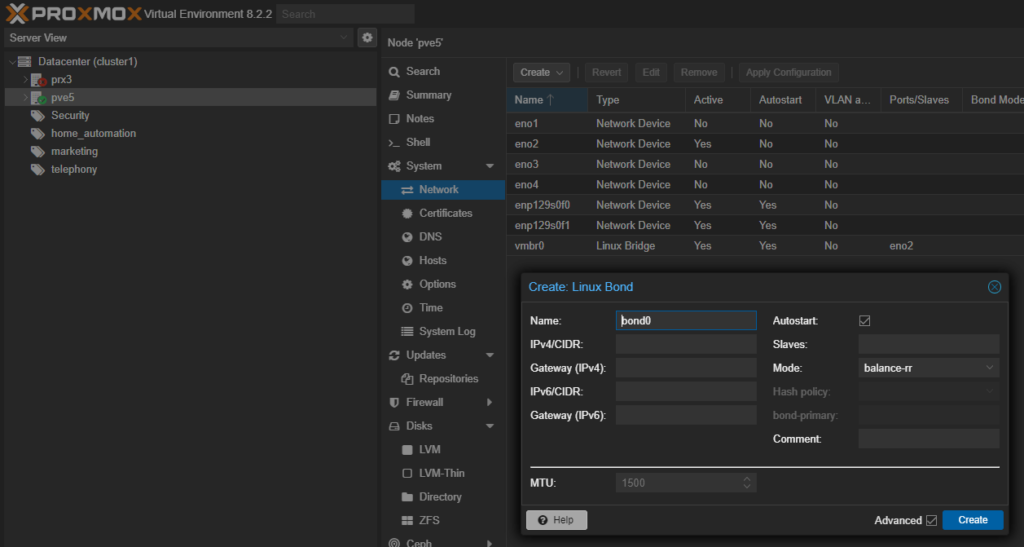
Step 2: Create a Network Bond in Proxmox
Access Proxmox Interface: Log in to the Proxmox web interface and navigate to Datacenter > Node > System > Network.
Create Bond:
- Click Create and select Linux Bond.
- Choose a name for the bond (e.g.,
bond0) and select the network interfaces you want to include (e.g.,eth0andeth1). - Under Mode, select the bonding mode (e.g.,
active-backupfor redundancy). - Configure other parameters as necessary (e.g., MAC address policy).
Save and Apply Changes: Once you’ve configured the bond, save the settings. Proxmox will prompt you to apply the changes.
Step 3: Create a Bridge and Attach it to the Bond
Once the bond is created, the next step is to create a bridge that will allow your VMs to use the bonded network connection.
Create a Bridge:
- In the Proxmox web interface, click Create and select Linux Bridge.
- Choose a name for the bridge (e.g.,
vmbr0). - Set the Bridge ports to the bond you created earlier (e.g.,
bond0). - You can also specify an IP address for the bridge if it’s going to handle the host’s network connection.
Save and Apply Changes: After configuring the bridge, save the settings. Proxmox will again prompt you to apply the changes.
Step 4: Verify Your Network Configuration
After setting up the bond and bridge, it’s important to verify that everything is functioning as expected.
Check Interface Status:
- You can check the status of your bond and interfaces by running
ip linkor by navigating to Node > Network in the Proxmox interface to ensure that the bond is active and both interfaces are up.
- You can check the status of your bond and interfaces by running
Test Failover:
- Disconnect one of the physical network cables and observe whether network traffic seamlessly switches to the other interface.
- Reconnect the cable and ensure traffic flows through both interfaces as expected.
Ping Test:
- Perform a continuous ping to the Proxmox host to confirm that there are no packet losses during the failover.
Step 5: Configure VMs to Use the Bridge
Once the bond and bridge are properly configured and tested, you can configure your VMs to use the new bridge.
VM Configuration:
- Go to the VM settings in Proxmox.
- Under Hardware, select Network Device and set the bridge to
vmbr0(or whatever name you chose for the bridge).
Start the VM:
- After applying the changes, start the VM. It should now use the bonded network interface through the bridge, benefiting from the redundancy you’ve set up.
Optional: VLAN Configuration
If you’re using VLANs in your network, Proxmox allows you to configure VLAN tagging on the bridge.
- Configure VLANs on the Bridge:
- In the Network Device settings for your VM, you can specify the VLAN tag under the VLAN Tag field. This allows the VM to participate in different VLANs, all while using the bonded and redundant network setup.
Conclusion
Using Linux bonds and bridges on Proxmox servers provides a powerful and flexible solution for network redundancy. By bonding multiple network interfaces, you ensure that your servers remain online even in the event of a network failure. Bridging allows your VMs to benefit from the redundancy while maintaining a clean and efficient virtual network.
Whether you’re using basic active-backup bonding or more advanced LACP configurations, Proxmox makes it easy to set up and manage a redundant network environment, keeping your infrastructure robust and resilient.

